For this brief my aim was to complete a set of 5-7 fashion shoot images interpreting the word home in whatever way that I wanted. I began by planning out general ideas that I related to the word home and then from this I thought of a starting point being ‘homeless’ and developed my ideas further. I researched into many different projects representing this idea and collected information as well as images and videos that showed a connection to homeless in diverse ways.
My final idea was to create fashion images with the intention to express how you don’t need to spend a lot of money to look good as I decided to have a budget of £5.00 on clothing that totalled this amount. I further developed my ideas by researching into different styles and ways to emphasise this idea of homeless and I thought it was necessary to experiment with the clothing items and hair/makeup styles so that I had some evidence of planning before shooting. This was a huge help for when shooting because I was organised with the different looks I wanted to show within my images. I have also explored different locations to see which would be the best for backdrops in my photographs and I decided on the location Banks after changing my ideas and gaining new ideas. Planning out sketches was also useful to me because I was able to see how I wanted my models positioned and posed in my photographs. Personally, I feel that my work is clearly laid out and it is easy to understand on my blog so I didn’t think it was necessary to explain everything in my evaluation as this would just be repeating explaining everything I have presented.
My final fashion shoots were a success and the weather was as I hoped it would be so this was an advantage when shooting my final images. I have chosen 5 images for my final that I felt were the strongest after developing and adjusting them slightly on Photoshop. I have included screen prints to show exactly what I have altered on my photographs for them to look this way.
Some problems occurred whilst planning out my work for this blog, unfortunately my original model Natalie wasn’t able to attend my final location shoots on the day that I had planned so I had to use another model, my friend Charlotte who was very eager to help out. I don’t think this was a major problem though as she was just as confident as Natalie for my experiments and I genuinely think Charlotte was a good choice for modelling in my final shoots. I also had some problems with the lighting as some of my images appeared slightly too dark but after using Photoshop to adjust this problem, I managed to improve the quality of them.
Overall, I am generally pleased with my outcome, although my final images don’t clearly show the idea homeless, I have explained my intentions and the reasons behind my fashion shoots. If I were to do this work again, I would experiment more with the lighting because I was unsure on the day of shooting and relied upon my assistant a lot when I should have been more organised with knowing this myself.
Monday 12 April 2010
Saturday 10 April 2010
Final Images for my project ♥
Final Image 1.


Final Image 3.
Final Image 4.
Final Image 5.

Final Image 2.

Final Image 3.

Final Image 4.

Final Image 5.

Thursday 8 April 2010
Editing on Photoshop♥
Screen Prints
Image one.


For my first image, I have focused mainly on correcting the lighting by dodging and burning areas in the frame. I felt that the original image of this wasn't light enough so I experimented with the levels as you can see here to improve the lighting quality. The developed photograph is definitely clearer to see what's been shown.
Image 2.
This next image needed a lot of development done and I have cloned areas such as the glasses where the reflection is showing the flash from the camera, the shoes so that they can't be seen in the picture and the bra so that the dress looks complete. I had difficulty trying to clone the areas because I had to make sure that it didn't look blurry and it look a long time trying to disguise these aspects I didn't want within my picture. I am pleased with the results though as I didn't think I was able to achieve this. I have also used the dodging tool to lighten sections that needed enhancing as you can see here, my model Charlotte needed her face lightening and Becky's arm needed slightly adjusting.
Image 3.
This photograph was way too dark originally and there were some flash reflections on the metal bar on the ceiling. I have experimented with the levels to improve the lighting in the picture and I have used the dodging tool for final improvements. I also thought it was necessary to clone out the lighting reflection so that it wasn't visible in the frame. I believe this image looks much better now it has been developed.
Image 4.
For this next photograph I was stuck between two images of my model Charlotte. I have adjusted the lighting and developed the contrast to make it visually stronger as a picture and I have cloned the glasses so that the reflection doesn't appear on them. By darkening areas with the burning tool, it has given my image that much more depth and the tones are more dominant and powerful. I did have a problem with cloning the reflection out of the picture though, the leading lines were in the way so it was difficult for me to disguise the mistakes out. However, once the image had been zoomed out, you couldn't even see the areas I had adjusted anyway so this wasn't a major problem.
Image 4. (Another)
This image was the other I couldn't decide on for my final but I now that I have tried developing it I won't be using this for a final image because there are some aspects that are poor quality. The legs were too bright originally but when I tried burning them with the burning tool, the tones on my models legs started to appear pixelated and slightly saturated so I wasn't keen on the picture after that. As well as this problem, I had difficulty with the background because this too looked really pixelated when I lightened the image but when I darkened it the background was too dark in some areas. For these reasons I don't think it would be appropriate for using this as a final image.
Image 5.

My final image needed a couple of adjustments, the whole image needed to be lightened with the dodging tool and some areas needed cloning because of the flash light reflection. I have cloned the light on the shades and on the wall because next to my model Lewis, the spray paint didn't look right at all. I believe that the tones in the picture have much improved now that I have experimented with the different tool effects and by lightening the image, it has brought the models forward in the frame. I quite like the way the levels tool has smoothened out the shadows so that are not to overpowering and seperated the darker areas from the lighter areas correctly. After looking over this image, I have realised that the necklace that my model Charlotte is wearing isn't suppose to be worn here. My clothing is meant to be set to a price budget of £5.00 and with this pearl necklace my clothing pricing for my model Charlotte comes to £5.50. As I won't be able to re-shoot this final image on location, I will try and clone out this necklace so that my budget is to the correct price.
Further Screen Print Development for final image 5.

Tuesday 6 April 2010
Final shoots on location ♥
Contact Sheet


Location shoot 5.


Here I have included a contact sheet so that I can compare the images and choose which ones I will display and develop on Photoshop for my final prints.
Location Images
Location shoot 1.


I decided on this pose because I thought it best suited the style of clothing and fits well within the frame. I tried experimenting with the different settings on the camera for the lighting so that I have a range of images to choose from for my final shoots. I am especially fond of the pose where Lewis is holding his necklace and looking down sideways however I am not so keen on the image where he is just facing the camera with his hands in his pockets because it's so ordinary and simple and I wanted to create something that people aren't really familiar with. Therefore, I shall further experiment on Photoshop with the last two images of him here, I think with a bit of adjusting this will improve the quality and appearance of my this image.
Location shoot 2.


For this next set of images, I was trying to create a serious approach to fashion photography by having my models dominant within the frame posed in this close way. I wanted to give the impression that my model Lewis was holding my model Becky back to create a narrative within the frame as well as just showing off the clothing within the photograph. I think this is a strong image, I will have to adjust some things on Photoshop as the lighting isn't quite correct but I was generally pleased with the concept of this image and the outcome of the shoot.
Location shoot 3.


Here, I have tried with a variety of different poses to create this look I was going for. On some of these photographs, the shoes are showing so I won't be able to use these for my final because my budget is £5.00 and the pricing will be over but I had to have my models in their shoes because it's quite a dangerous place for going bare foot. If I am able to crop my images and adjust them on Photoshop, I might be able to get away with using one of them for my final however I do actually prefer the images where the shoes aren't showing so I will have to test them out and see which look better. I was trying to create an image where the models seem to be looking direct at something out of the frame, this was to intrigue the viewer as to what these models are looking at and to create poses that best suited this concept. I tried to position my models so that they were next to each other but create depth in my photographs by having the models close up and the background walls far away
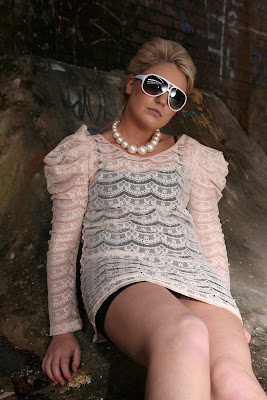
Location shoot 4.


This look was influenced by the 'Paper Bag Princess' image that is displayed in my research. I tried to re-create this by having my model sat on the floor appearing as if she's helpless and stiffly posed so that all attention is placed on the clothing she is wearing and nothing else. I have experimented with a few poses to see which looked better as the area I was shooting in had a skating ramp which could be used for many different poses. I will have to play around on Photoshop and experiment with the lighting because even though I have managed to achieve the correct lighting within each frame, I think the images need something more to them and maybe need darkening in some areas within the frames.
Location shoot 5.


For these final images, I was greatly influenced by the images displayed on the following website, http://www.ax80.com/2008/09/nntm-6-episode-3-homeless-fashion.html. The images on this website are showing models in a homeless environment where these poor people are apart of the pictures. I was focusing more on the pose and structure of the images and wanted to create a similar approach to this project. I have tried to be creative by adding a narrative within the frame which shows Lewis and Charlotte looking at each other to give the impression that they are flirting in a way next to Becky who seems to be oblivious because she is so involved with trying to look good in the clothing she is wearing. However, once I managed to capture this in my images, I new these didn't look right and there was something missing so I tried to position my models in a different way to appear more like the models within the photographs on the above website. I am a lot happier with my developed image where my models look more relaxed and confident posed in a way that works well within the frame. My models appear more laid back and cool in the photograph where my model Charlotte is looking else where while Becky and Lewis are focused looking directly towards the camera. I will experiment on Photoshop anyway with the levels and contrast to see what effects I can create.
Mini Evaluation ♥
For this project, I have been influenced to produce images with a general concept relating to the idea of the homeless. Throughout my work, I have researched into different bodies of work to collect ideas for my final shoots. Personally, Whilst planning and developing my work for my final, my ideas have come together well and I believe I have a strong enough plan to create some effective images. Some problems have occurred during my project such as my model change due to my original model not being able to attend my shoots on the day I have planned and not being able to use the flash light for my camera appropriately but I have now booked out the Metz flash which I know how to use properly and I have a new model called Charlotte who is just as glamorous as Natalie so I have no major worries for my final shoot.
For my research, I think I have gathered some really strong images and videos as well as information behind them to allow me to develop my work further successfully. I am well organised for this final shoot now so I hope all goes well and I am able to achieve my fashions shoots on the 8th April. My only worry is if the weather isn't great but I have checked the weather forecast and it should be a generally nice day for shooting.
My aim is to create images using clothing at a budget of £5.00. I have chosen this idea because it links well with the concept of homelessness in the way that shows cheap clothing but brings fashion into it as well. I am hoping that my photographs express the beauty of cheap clothing and shows that you don't have to spend a lot to look good. This I have explained in my previous annotations. I know that my images won't express this idea of homelessness directly but this was my starting point and I have obviously expanded on this to build up fashion shoots relating to the concept of it.
Final Planning for final shoots ♥
Hair styles I will use: For the hair styles I shall create the following:
Lighting I will use: I will be using a flash and a reflector to produce different effective images. I am going to experiment on my fashion shoots with the reflector so that I create different effects of light within my photographs. I shall test out the flash light with the reflector and bounce the light onto my subject matters. I was really inspired by the lighting in the America's Next Top Model homeless fashion shoots. I could try and create a similar effect by having my images quite dark and have the flash shining on one specific model in the different frames. This will show an influence of this particular work but at the same time portray my own style of imagery. I am a little nervous for my shoots although I am quite confident as I have already experimented with the lighting and I have an assistant there to help me if I am unsure of anything. My assistant is Jess Blackburn, she is also a photographer studying the same degree as me so this is a positive aspect of having her there on my location shoots. I appreciate that Jess offered to help me with my shoots as I understand she has her own work to concentrate on as well. I am rather lucky to have some extra help because I wouldn't be able to achieve these on my own. Lewis and Becky are too both photography students at university, so this again is a bonus if help is needed.
Pose/Composition I will use:


- Charlotte's hair style being up back-combed and nest like at the back- the same style as the first image on the 'practical experiments(4)' page. This will be for the shoot where she will be on her own and where she is modelling with Becky wearing the lace dress, shades and pearls.
- Charlotte's next hair style being down and completely back-combed. This will be for the shoot where she will be modelling with all of the models. This is actually displayed clearly in my clothing section for my planning.
- Becky's hair style being up and messy, a little back-combed with pieces of hair coming down either side of her face. This is going to be styled for the shoot where Becky is modelling with all of the models. Even though this hair style is not shown in the planning clothing section below, the same style as this is displayed on the 'practical experiment(2)' page.
- Becky's hair style being down and back-combed. This will be for the shoot where Becky is modelling with Charlotte and the other shoot with Lewis. This hair style is actually indicated below in the planning clothing section.
- Lewis's hair style being gelled spiky as its quite short to do anything else with. This will be for all the modelling shoots. The actual hair style is shown on the 'practical experiment(3) page and displayed below in the planning clothing section.
Makeup I will use: For the makeup I have decided to keep the style the same for each model because it will be complicated and time consuming having to change styles if I decided on more than one makeup style for each model. Therefore, because of this reason, I shall use the following makeup for each model...

Becky having the eye-liner painted on her eyes like in the image displayed here
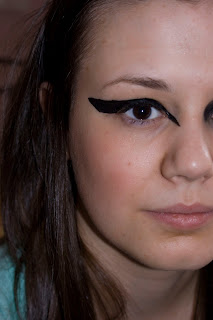
 Charlotte having the eye- shadow and eye-liner created like the style in the image displayed here but not as severe because I think this might be a little too much.
 Lewis having his eye-shadow just appearing underneath his eyes like in the image here. I only wanted to make his eyes look a bit smokey so there was no need to do anything else with the makeup for this.
Charlotte having the eye- shadow and eye-liner created like the style in the image displayed here but not as severe because I think this might be a little too much. Lewis having his eye-shadow just appearing underneath his eyes like in the image here. I only wanted to make his eyes look a bit smokey so there was no need to do anything else with the makeup for this.
 Clothing I will use: I have decided on four different clothing between the two female models, Becky and Charlotte and two specific styles of clothing for my male model, Lewis. These are displayed below...

I am going to have Becky Wearing this outfit in the fashion shoot including all of these models.
 I shall have Charlotte wearing this outfit in the fashion shoot where she is on her own and in the shoot with Becky.
 This style of clothing is going to be worn by my model Becky. She will be modelling in this clothing for the shoot with Charlotte and the Shoot with Lewis.
 I shall have Charlotte wearing this outfit in the fashion shoot where she is on her own and in the shoot with Becky.
 This style of clothing is going to be worn by my model Becky. She will be modelling in this clothing for the shoot with Charlotte and the Shoot with Lewis.
This style of clothing will be worn by my model Charlotte. This shoot will be including all three models.
 This clothing will be worn by my model Lewis. I shall have him wearing this in the shoot with Becky and the Shoot where he appears on his own.
I shall have my model Lewis wearing this outfit in the shoot where all three models are a part of.
 This clothing will be worn by my model Lewis. I shall have him wearing this in the shoot with Becky and the Shoot where he appears on his own.
I shall have my model Lewis wearing this outfit in the shoot where all three models are a part of.
Backdrops I will use: I have already displayed some images of the new location I will shoot at. This location is based in Banks near Southport. It's basically a run down half knocked down building that I'm assuming teenagers hang out at due to all the graffiti covering the walls. I think this is a perfect location to photograph my fashion shoots at, I have organised for the models and assistant, as well as me of course, to travel there in two cars. We shall set off at 9 o'clock in the morning and hopefully complete the shoots by late afternoon. Depending on the weather depends upon whether I will shoot on this day or have to re-arrange my shoot because it isn't appropriate to photograph a fashion shoot in the rain when my style is to show off the clothing as well as the hair styles and makeup. The date of my fashion shoot is set for 8th April so if all goes to plan, I should end the day on a positive note.
Lighting I will use: I will be using a flash and a reflector to produce different effective images. I am going to experiment on my fashion shoots with the reflector so that I create different effects of light within my photographs. I shall test out the flash light with the reflector and bounce the light onto my subject matters. I was really inspired by the lighting in the America's Next Top Model homeless fashion shoots. I could try and create a similar effect by having my images quite dark and have the flash shining on one specific model in the different frames. This will show an influence of this particular work but at the same time portray my own style of imagery. I am a little nervous for my shoots although I am quite confident as I have already experimented with the lighting and I have an assistant there to help me if I am unsure of anything. My assistant is Jess Blackburn, she is also a photographer studying the same degree as me so this is a positive aspect of having her there on my location shoots. I appreciate that Jess offered to help me with my shoots as I understand she has her own work to concentrate on as well. I am rather lucky to have some extra help because I wouldn't be able to achieve these on my own. Lewis and Becky are too both photography students at university, so this again is a bonus if help is needed.
Pose/Composition I will use:


Monday 5 April 2010
Practical Experiments and Research- style (4) ♥
Hair style Influences

These are just images of hair styles that I found on www.google.com. I wanted to see the different popular hair styles around at the moment and these celebrity images have sure give me some ideas for my own hair style designs. I thought it would be useful to focus on celebrity hair styles instead of ordinary hair styles because these will be professional looks and more or less perfect and so this will have a slight glamorised approach to them. As I am quite creative, it is easy for me to recreate hair styles that I see so I can maybe take one of these hair styles and create it in a similar way but interpret it into my own style.
Makeup Influences


The Face Magazine- NO 85I chose this to include within my research because I like the way the eyes are not too striking with makeup but have this smoky look that seems to work quite well within the image. By having her other eye covered, this puts all attention on the eye that is showing which enhances the appearance of the makeup. The eye is the main focus of the image and if the model was posed in a different way and the other eye had been uncovered, maybe this would loose all attention off the makeup in the frame.

I have uploaded some more contact prints to help me figure out which photographs are the most successful from what I have taken. I quite like each image here, although they aren't big enough on the contact prints, I am going to upload the images that I feel will be useful for planning my final shoots and display them below...


These are just images of hair styles that I found on www.google.com. I wanted to see the different popular hair styles around at the moment and these celebrity images have sure give me some ideas for my own hair style designs. I thought it would be useful to focus on celebrity hair styles instead of ordinary hair styles because these will be professional looks and more or less perfect and so this will have a slight glamorised approach to them. As I am quite creative, it is easy for me to recreate hair styles that I see so I can maybe take one of these hair styles and create it in a similar way but interpret it into my own style.
Makeup Influences

i-D Magazine- The Visionary Issue NO.133
Photographer- Craig McDean
Makeup- Pat Mcgrath
Styling- Edward Enninful
Model- Sarah Murray
October 1994
I was focusing on the makeup in this image. The eyes appear quite smoky even though it is a natural pose and photograph. Everything else is so simply that's why the eye makeup may seem to stand out clear from everything else in the image.


i-D Magazine- The Underground Issue NO.134
Model- Bridget Hall
Photographer- Steven Klein
November 1994
This front cover is overpowering with colour and style. The eye makeup is very persistent in the frame but instead of me just focusing on the eye makeup, this shows off the hair style and the clothing and not forgetting the cocky over-exaggerated pose. This is something I am drawn to the most for some reason, I just love the layout of the cover, it is massively eye-catching.


i-D Magazine- The White Issue NO.203
Cover Model- Luciana Curtis
Photographer- Kayt Jones
November 2000
I am so influenced by this style of makeup. I was drawn in as soon as I glanced at this front cover. I quite like the way the darker shade of makeup is outlining the top of her eye lid and flicks out lower near her eye with the pink colour dominant in the middle. This still has a slight smoky effect but it includes colour to make the makeup look visually exciting.

The Face Magazine NO. 85
pg 101
Photographer- Ellen Von Unwerth
October 1995
This image is quite seductive from the way this model is posed and from her facial expressions shown. I am most interested by the makeup to be honest... I am a fan of flicks anyway but even more so with this image because they extend the shape of her eyes and give a smoky approach to the image.

The Face Magazine- NO 85
Photographer- Ellen Von Unwerth
Styling- Cathy Kasterine
Model- Raina at Ford NYC
Makeup- Kay Montano for smile
October 1995
Experimenting with my model Charlotte- Focusing on the Makeup style and Hair style.

I have uploaded some more contact prints to help me figure out which photographs are the most successful from what I have taken. I quite like each image here, although they aren't big enough on the contact prints, I am going to upload the images that I feel will be useful for planning my final shoots and display them below...
Focusing on the hair style


This hairstyle is one of my favourites. I tried to back-comb all of the front part of Charlotte's hair so it looked really messy but still glamorous. I have completely back-combed all the back and clipped it to give it this nest look. I am thinking about using this hair style within one of my fashion shoots because I feel that it would fit in well with the theme I am trying to portray. I thought of this hair style myself, I have only had influence from the back-combed look but this show's my own style and creativity. I think when the makeup is properly finished and the clothing is on, this hair style will complete this glamorous but yet grungy look.


I found a similar hair style to this on the Internet and I was really influenced in using this idea within my shoots because I feel that it would look really effective with the grungy style location as my background. I thought this was quite a cute hippy look but still has this back-combed appearance to it which makes it seem scruffy and messy. I took this idea and made it into my own, Charlotte wasn't too keen on the idea although I am rather fond of it. If I manage to create something that relates better to my project then I won't consider using this within my final shoots. 


This was quite a fun hair style to create, we had some laughs when styling it. This is slightly similar to the above hair style although I have taken the hair from the bottom and clipped it to the middle whereas the above hair style was just clipped to make a messy nest at the back. Even though I like this hair style, I believe that there have been stronger designs that I have come up with for this project and so for this reason I probably won't use this for my final fashion shoots. I still think the front back-combed quiff looks funks and quirky so I shall take this into consideration when finalising my designs.


I was going for more of a hippy cool casual look for this hair style. I wanted to experiment with a different style although still have this back-combed feel to it. I think this style would only look right within my shoots with someone with longer hair and I have actually created this style for my model Becky which seems to appear more effective. With shorter hair, I think it is best sticking with full on back-combed hair and maybe a few clips here and there to create a style like the first few I have tested out for Charlotte.
Focusing on the Makeup Style


For the makeup, I have focused on using the eye-liner to create quite a funky but elegant look. I have experimented with both black and blue eye-shadow to see the difference between these smokey makeup styles. I am really interested in using the eye-liner like it is displayed on the last photograph experiment, the long line flicks give the impression that the eyes are much fuller and wider. Even though people normally use black eye-shadow to create a smokey appearance, I feel that the blue colour still works just as effective and actually brings some colour into the image instead of a dull black/ grey colour. I shall have to take this on board when focusing on the makeup for my final shoots.
Subscribe to:
Posts (Atom)